
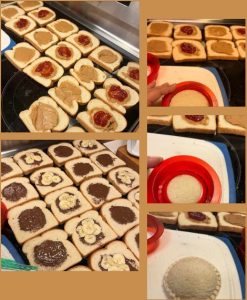
I know a lot of people have posted these but I wanted to show a more thorough process and price breakdown. I made homemade uncrustables for the freezer for my girls lunches for school. PB & J and Nutella & Banana. I made 29 sandwiches in 45 minutes. This sure beats buying them in the store (4 for $6) and saves time in the morning!!
Ingredients and Price:
Peter Pan Honey Peanut butter 1/2 of the big jar $2.65 ($5.29)
Aldi strawberry preserves 1/2 of jar $1.70 ($3.40)
Nutella $3.60
1 banana $.30
3 loaves of Wonder bread Buy 1 Get 1 sale $4.65 ($3.30 loaf full price )
Total $12.90 for 29 sandwiches or $.44 each
Ziploc sandwich bags $2 for a box of 40
Uncrustables maker from Amazon- $9.96
Homemade Freezer Uncrustables
Ingredients:
- Peter Pan Honey Peanut Butter (1/2 of the big jar) – $2.65
- Aldi Strawberry Preserves (1/2 of jar) – $1.70
- Nutella – $3.60
- 1 Banana – $0.30
- 3 Loaves of Wonder Bread (Buy 1 Get 1 sale) – $4.65
- Ziploc Sandwich Bags (40-count box) – $2.00
- Uncrustables Maker from Amazon – $9.96
Total Cost: $24.86
Yield: 29 sandwiches
Cost per Sandwich: $0.44
Instructions:
- Prepare Ingredients:
- Gather all the ingredients and make sure they are easily accessible.
- Peel and slice the banana into thin rounds.
- Spread Peanut Butter and Preserves:
- Lay out slices of Wonder Bread.
- On one slice, spread Peter Pan Honey Peanut Butter.
- On another slice, spread Aldi Strawberry Preserves.
- Assemble the PB & J:
- Place the banana slices on top of the peanut butter side.
- Press the preserves side onto the banana slices, creating a sandwich.
- Make Nutella & Banana Sandwiches:
- On a separate set of bread slices, spread Nutella.
- Place banana slices on one Nutella-covered slice.
- Press the other slice onto the bananas, creating Nutella & Banana sandwiches.
- Cut and Seal:
- Use the Uncrustables Maker from Amazon to cut and seal the sandwiches. Press firmly to ensure a good seal.
- Packaging:
- Place each sandwich into a Ziploc sandwich bag, ensuring they are well-sealed.
- Freezing:
- Arrange the sandwiches in a single layer in the freezer and freeze until solid.
- Storage:
- Once frozen, you can store the sandwiches together in a larger freezer bag.
- To Serve:
- In the morning, take a sandwich from the freezer, and by lunchtime, it will be thawed and ready to eat.
Enjoy your homemade uncrustables that are not only cost-effective but also allow for customization based on your preferences!
BEST TIPS TO MAKE Homemade Freezer Uncrustables
- Assembly Line Approach:
- Set up an assembly line with all your ingredients and tools to streamline the process. This makes it easier to create sandwiches efficiently.
- Use a Quality Uncrustables Maker:
- Invest in a good Uncrustables maker for consistent results. The Amazon tool mentioned in the original recipe is a great option. Ensure it’s durable and easy to use.
- Bread Selection:
- Choose a soft and fresh bread that freezes well. The Wonder Bread mentioned in the recipe is a good choice. Consider whole wheat or multigrain for a healthier option.
- Spread Ingredients Evenly:
- Spread peanut butter, preserves, and Nutella evenly to ensure a balanced flavor in every bite. This also helps with proper sealing during the sandwich-making process.
- Banana Slices:
- Slice the bananas thinly to ensure they don’t create a bulky layer, making it easier to seal the sandwiches without the filling squeezing out.
- Seal the Edges Well:
- Pay attention to sealing the edges properly using the Uncrustables maker. Press firmly to create a tight seal, preventing the filling from leaking during freezing.
- Remove Air from Ziploc Bags:
- When placing sandwiches in Ziploc bags, remove as much air as possible to prevent freezer burn and keep the sandwiches fresh.
- Label and Date:
- Label each Ziploc bag with the sandwich type (PB & J or Nutella & Banana) and date of preparation. This helps you keep track of freshness and variety.
- Freezing Time:
- Freeze the sandwiches in a single layer initially to prevent them from sticking together. Once frozen, you can store them in a larger freezer bag for more efficient storage.
- Thawing Process:
- Plan ahead for the morning rush by taking a sandwich out of the freezer the night before. Thawing in the refrigerator or at room temperature ensures a ready-to-eat lunch.
- Customization:
- Experiment with different spreads, fruits, or even add-ins like chocolate chips or granola to cater to individual preferences.
- Batch Preparation:
- Make a large batch at once to save time and effort. The assembly line approach is particularly helpful when preparing multiple sandwiches.
- Cost-Effective Ingredients:
- Look for sales and discounts on ingredients to maximize cost savings. Buying in bulk when items are on sale can further reduce the overall cost per sandwich.
- Storage Organization:
- Keep your freezer organized by arranging the sandwiches neatly, making it easier to find and grab the desired flavor.
By following these tips, you can make the process of creating homemade freezer uncrustables more efficient, cost-effective, and enjoyable.
Q: Can I use different types of bread for homemade freezer uncrustables? A: Yes, you can use different types of bread based on your preferences. However, it’s recommended to choose a soft and fresh bread that freezes well. Whole wheat or multigrain options can be healthier alternatives.
Q: How long do homemade freezer uncrustables last in the freezer? A: Homemade freezer uncrustables can last up to 1-2 months in the freezer. Properly sealed and stored sandwiches maintain their quality for a longer duration.
Q: Can I customize the fillings in homemade uncrustables? A: Absolutely! Feel free to experiment with different spreads, fruits, or even add-ins like chocolate chips or granola to cater to individual tastes.
Q: Can I make a large batch of homemade uncrustables and freeze them all at once? A: Yes, batch preparation is encouraged for efficiency. You can make a large batch, freeze the sandwiches individually, and then store them together in a larger freezer bag for convenient storage.
Q: How do I thaw homemade uncrustables? A: Thaw the sandwiches in the refrigerator overnight or at room temperature for a few hours. Planning ahead by taking a sandwich out of the freezer the night before ensures a ready-to-eat lunch in the morning.
Q: Can I use a different brand for the uncrustables maker? A: Yes, you can use a different brand of uncrustables maker, as long as it provides a similar function of cutting and sealing the sandwiches effectively. Ensure that it is durable and easy to use.
Q: Are there any alternative fillings for homemade uncrustables? A: Absolutely! You can use different types of nut butter, jams, jellies, or even cream cheese as alternative fillings. Get creative and customize the sandwiches to suit your taste preferences.
Q: Can I make homemade uncrustables ahead of time for the week? A: Yes, you can make a batch of homemade uncrustables ahead of time and store them in the freezer for the entire week. Properly sealed and stored sandwiches maintain their freshness.
Q: Can I save money by buying ingredients in bulk for homemade uncrustables? A: Yes, buying ingredients in bulk, especially when they are on sale, can help save money in the long run. Look for discounts and promotions to maximize cost savings.
Q: Can I make these uncrustables without a specialized uncrustables maker? A: While a dedicated uncrustables maker provides a convenient and uniform method, you can use a round cookie cutter or the rim of a glass to cut and seal the sandwiches manually. Just ensure you press firmly to seal the edges well.