
DIY YoCrunch-Style Yogurt Cups (Budget-Friendly Lunchbox Snack)
This isn’t really a “meal,” but it’s a perfect snack, dessert, or lunchbox filler—especially for busy families. With five kids constantly asking for YoCrunch yogurts, those store-bought cups add up fast. So I decided to make my own version at home, and honestly… they were a hit!
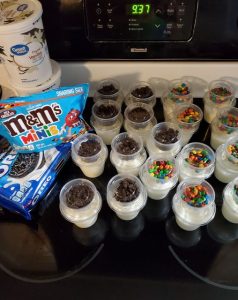
This quick prep made 20 homemade YoCrunch-style yogurt cups in about 15 minutes, using simple ingredients I already love. While the savings weren’t massive, every dollar counts when you’re feeding a big family—and the leftovers mean I can make even more next week.
Ingredients
-
2 large tubs vanilla yogurt
-
1 shareable bag M&M Minis
-
1 package Oreos
-
20 small plastic cups with lids (or reusable containers)
Cost Breakdown (example):
-
Vanilla yogurt: $3.68
-
M&M Minis: $2.98
-
Oreos: $3.18
Total: $9.84
Store-bought YoCrunch (20 cups): approx. $14
Homemade wins—plus extra toppings left over!
Instructions
-
Place your 20 cups on the counter or a baking sheet for easy filling.
-
Evenly divide the vanilla yogurt between all cups.
-
Crush the Oreos (rough or fine—your choice).
-
Add a small scoop of Oreo crumbs and a sprinkle of M&M Minis to each cup.
-
Seal with lids and refrigerate until ready to eat.
That’s it! Simple, quick, and kid-approved.
Helpful Tips
-
Use thick yogurt (Greek or custard-style) to better hold toppings.
-
Add toppings just before eating if you want maximum crunch.
-
Pre-portion toppings in tiny containers for lunchboxes.
-
Crush cookies in a zip-top bag to avoid mess.
-
Label lids with names if packing for multiple kids.
-
Freeze for 30 minutes for a firmer, dessert-style texture.
-
Buy toppings in bulk to reduce long-term costs.
-
Use reusable containers to save even more money.
-
Don’t overfill—leave room for mixing.
-
Let kids customize their own cups for less complaining 😉
Fun Variations
-
Chocolate Lovers: Use chocolate yogurt + brownie bits.
-
Healthier Version: Vanilla Greek yogurt + granola + dark chocolate chips.
-
Fruit Crunch: Add strawberries, blueberries, or banana slices.
-
Peanut Butter Crunch: PB chips + chocolate candies.
-
Cookie Swap: Use chocolate chip cookies, graham crackers, or animal crackers.
-
Holiday Theme: Red & green candies for Christmas, pastel sprinkles for Easter.
-
Dairy-Free: Use coconut or almond milk yogurt.
-
Protein Boost: Mix in vanilla protein powder before portioning.
-
Caramel Crunch: Add caramel drizzle and crushed pretzels.
-
Birthday Cake: Funfetti yogurt + sprinkles.
Storage & Make-Ahead
-
Store covered cups in the refrigerator for up to 4–5 days.
-
Best texture is within the first 3 days.
-
Keep toppings separate if prepping far in advance.
Frequently Asked Questions (FAQ)
1. How many cups does this recipe make?
About 20 small yogurt cups.
2. Can I use Greek yogurt?
Yes! It’s thicker and higher in protein.
3. Can I make these sugar-free?
Absolutely—use sugar-free yogurt and toppings.
4. Will the toppings get soggy?
They can over time. Add toppings right before eating if crunch matters.
5. Are these freezer-friendly?
They can be frozen, but texture will be more like frozen yogurt.
6. Can I use flavored yogurt instead of vanilla?
Yes—strawberry, chocolate, or birthday cake all work well.
7. How long do they last in the fridge?
Up to 4–5 days when sealed properly.
8. Can kids help make these?
Definitely! It’s a great hands-on kitchen activity.
9. What size cups should I use?
4–6 oz cups work best for snacks and lunchboxes.
10. Is this really cheaper than store-bought?
Yes—plus you get leftover toppings for future batches.
Why This Recipe Works
✔ Budget-friendly
✔ Customizable
✔ Kid-approved
✔ Quick prep
✔ Perfect for school lunches