
My kid’s LOVE lunchables and it seems like they are so expensive for weekly lunches when we buy the brand name ones.
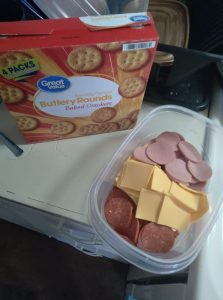
So I decided to take my cookie cutter (letters of the alphabet) I used the O. And made homemade lunchables.
Total for all of this was about 8$ and will last a week and a half for weekday lunches for 3 kid’s.
Took me about 5 mins to prepare and I didnt make all of what I bought either. This is about half of what I bought so there’s plenty more
Homemade Alphabet Lunchables
Ingredients:
- 1 pack of whole-grain crackers
- 1 pack of deli-sliced turkey or ham
- 1 pack of cheddar or mozzarella cheese, sliced
- 1 cup of cherry tomatoes, halved
- 1 cup of baby carrots, sliced
- 1 cup of cucumber, thinly sliced
- 1 cup of pretzel sticks
- 1 cup of grapes, halved
- 1 cup of ranch dressing for dipping
- Alphabet-shaped cookie cutter (or any preferred shape)
Instructions:
- Prepare Ingredients: Gather all the ingredients and make sure the fruits and vegetables are washed and sliced.
- Create Alphabet Shapes: Use the alphabet-shaped cookie cutter to cut the cheese and deli meat into fun letter shapes. You can involve the kids in this step to make it more enjoyable.
- Assemble Crackers: Place a layer of whole-grain crackers on one side of a compartmentalized lunch container or a sectioned tray.
- Add Cheese and Meat Shapes: Arrange the alphabet-shaped cheese and deli meat on top of the crackers. Mix and match the letters to create fun words or spell out the kids’ names.
- Include Fresh Vegetables: Fill another section with the halved cherry tomatoes, sliced baby carrots, and thinly sliced cucumber. This adds a refreshing and nutritious element to the lunch.
- Add Pretzels: In a separate section, place pretzel sticks for a crunchy and salty component. Kids love the satisfying crunch of pretzels.
- Include Fruit: Fill another section with halved grapes, providing a sweet and juicy treat to balance the meal.
- Pack with Dip: Include a small container of ranch dressing for dipping the vegetables and crackers. This adds a flavorful element and makes the lunch more interactive for the kids.
- Repeat for Multiple Lunches: Repeat the process for the number of lunches you want to prepare. Store the remaining ingredients separately to assemble fresh lunches throughout the week.
- Serve and Enjoy: When it’s time for lunch, the kids can enjoy putting together their own customized lunchables. This DIY approach not only saves money but also adds a personal touch to each meal.
Feel free to customize the ingredients based on your kids’ preferences and dietary restrictions. This homemade lunchable recipe provides a balanced and cost-effective alternative to store-bought versions